The Order of the Tutorials
We recommend watching the video tutorials in the order presented to learn how to use your device as easily and efficiently as possible.
Begin with the Setup Video Tutorials, then continue to the Reading Video Tutorials, followed by Vocal Commands, and so on.
At the end of each section, you will find a link to the next recommended video tutorial(s) to guide you through the learning process.
Setup Video 1: Unboxing
To get the video tutorial to play, click on the video image below.
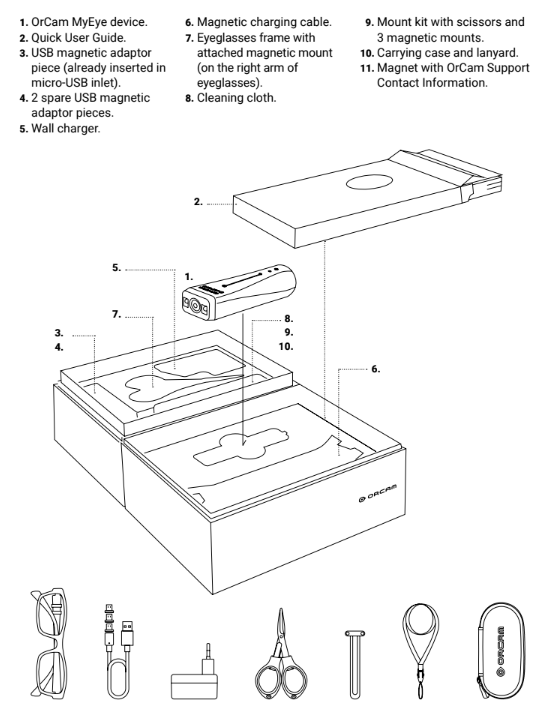
Box appearance
Note: The appearance of the box you receive may differ from the box in the video, however, the content of the box will be the same.
Recommendations on handling accessories
We recommend storing any accessories you are not using immediately safely in the original box.
This is especially important for small items, such as:
-
Two spare mini magnetic USB adapter pieces (sometimes referred to as “magnetic bits”).
These are approximately the size of a fingernail and form the small metal tip of the micro-USB charging cable.
Your device will typically arrive with one adapter already inserted to make charging easier.
(See Setup Video 3: Charging for more details.) -
Three additional magnetic mounts, which allow you to attach your OrCam MyEye to different glasses frames if needed.
(See Setup Video 4: Connecting the Magnetic Mounts for instructions.)
Keeping these accessories stored safely will help prevent loss and ensure they are available when needed.
Below is an image that visually shows as a line drawing all the items that come in the MyEye box and includes a description of each.
Setup Video 2: Parts and Buttons
To get the video tutorial to play, click on the video image below.
More Information on Parts and Buttons
Power Button
The power button is the circular button located on the inner flat surface of the device, near the rounded end.
You can identify it by the raised circular frame surrounding the button.
USB Mini Magnetic Adapter
If you move your fingers from the power button toward the rounded back end of the device and feel something protruding from the USB inlet, this means the USB mini magnetic adapter piece is already inserted.
In this case, you do not need to insert it yourself.
This will be clearer after watching Setup Video 3: Charging.
Eyelet Loop
The eyelet loop is a thin, firm metal wire loop located just behind the USB outlet, along the edge of the rounded end of the device.
If you wish to use it, gently pull it out using your fingernail.
Setup Video 3: Charging
To get the video tutorial to play, click on the video image below.
Considerations About the Magnetic Piece
Note: Your OrCam MyEye may arrive with the mini magnetic piece already inserted into the device.
If this is the case, to charge the device, simply bring the smaller end of the charging cable toward the rounded end of the MyEye. The cable will magnetically attach to the inserted mini magnetic piece.
The mini magnetic piece is designed to remain inserted in the device and does not need to be removed for charging.
Charging Considerations
Before first use, the OrCam MyEye should be charged for at least 3 hours.
After the initial charge, subsequent charging cycles typically take approximately 1 hour to charge the device from 0% to 100%.
Setup Video 4: Connecting the Magnetic Mount
To get the video tutorial to play, click on the video image below.
More information on Magnetic Mounts
The glasses included in the box come with a magnetic mount already attached to the right arm of the frame, allowing you to begin using your OrCam MyEye immediately.
If you are left-handed or if your left eye is stronger, you may prefer to attach the magnetic mount to the left arm of the glasses frame instead.
The video instructions will guide you step by step through the process of attaching the magnetic mount to your own glasses.
Glasses Frames Considerations
OrCam recommends using thicker eyeglass frames to provide better support for the device.
Please avoid using wire-frame glasses, as they may not securely support the OrCam MyEye.
Setup Video 5: Power On/Off and Suspend
To get the video tutorial to play, click on the video image below.
More Information on Powering the Device On and Off
Powering On
Note: When the device is powered off, press and hold the power button for about 2 seconds until you hear a beep.
The LED next to the power button will light up (green or orange/red). You can then release the button.
You will hear a series of intermittent beeps, and the LED may flash red periodically, until the device announces that it is ready for use.
Powering Off
To shut the device down:
- Press the power button once.
- Wait for the audio prompt: “Suspending. Press again to shut down.”
- Press the power button again to confirm shutdown.
Important: The device will not shut down if you press the power button twice in quick succession.
You must press once and wait for the spoken instruction before pressing again.
Suspend Mode Considerations
The OrCam MyEye will automatically enter suspend mode after 3 minutes of inactivity and will automatically shut down after 3 hours of inactivity.
You can change the automatic suspend time through the MyEye User Menu under General Settings.
The easiest way to do this is by saying: “Hey OrCam, change the auto suspend time.”
After a few seconds, follow the spoken instructions provided by the device.
This feature will be covered in more detail in the upcoming Settings Menu video tutorials.
Setup Video 6: Connecting to Bluetooth devices
To get the video tutorial to play, click on the video image below.
More Information on Bluetooth Connectivity
Note: There are several ways to access the Bluetooth settings on your OrCam device.
The video above explains both the manual method and the voice-command method using a double tap.
The easiest way to access the Bluetooth audio settings is to simply say:
“Hey OrCam, connect to the Bluetooth audio device.”
Wait a few seconds and then follow the spoken instructions provided by the device.
Setup Video 7: Charging and connecting to the OrCam Bluetooth earphones
To get the video tutorial to play, click on the video image below.
Considerations on Using Vocal Commands
Note: When using voice commands to connect to Bluetooth earphones, you do not need to use the double tap if you find it challenging.
Instead, you can simply say:
“Hey OrCam, connect to the Bluetooth audio device.”
The “Hey OrCam” voice command can be used as an alternative to the double tap, which is normally followed by a long beep.
Up next: Reading Video Tutorials for OrCam MyEye
Have more questions?
You can reach out to our team, and we'd be happy to help: submit a case.